Capturing the soul of an anime character often hinges on one crucial element: the eyes. Anime eye drawing is far more than just sketching pupils and irises; it’s the primary vehicle for conveying emotion, personality, and the very essence of the character. Whether you’re a complete novice picking up a pencil or a digital artist refining your style, mastering this fundamental skill unlocks a world of expressive potential. The exaggerated size, intricate details, and symbolic elements unique to anime eyes set them apart from realistic depictions, making them both challenging and incredibly rewarding to learn. This comprehensive guide dives deep into the techniques, principles, and common pitfalls, providing you with the knowledge to create anime eye drawing that truly captivates. Get ready to transform simple shapes into windows to the soul of your anime creations.
Understanding the Fundamentals of Anime Eye Drawing
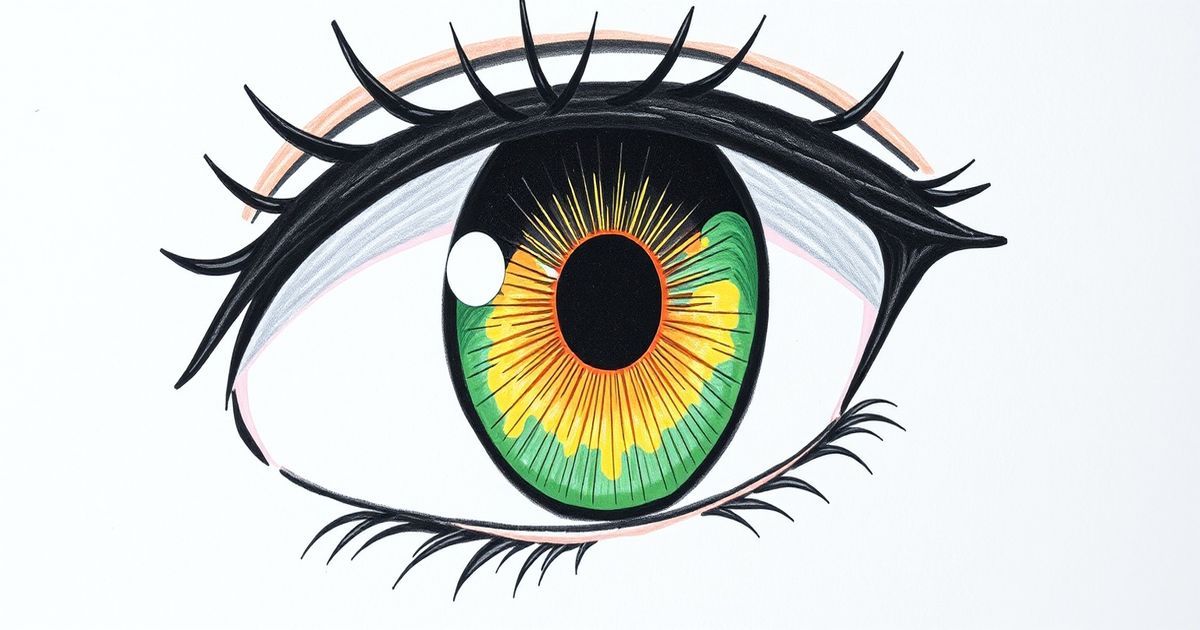
Before diving into complex details, grasping the core anatomy and stylistic conventions is essential. Anime eyes are characterized by their significant size relative to the face, often taking up a large portion of the head. This exaggeration serves a purpose: maximizing emotional impact. Key components include the large, often luminous cornea (the colored part), a distinct highlight (catchlight) that adds life and reflects the light source, and meticulously rendered eyelashes that frame the eye without overwhelming it. The shape itself varies dramatically – from sharp, angular eyes conveying intensity or menace to soft, rounded eyes suggesting innocence or vulnerability. Understanding the underlying skull structure, even in stylized form, prevents the eyes from looking flat or disconnected. According to Wikipedia, the evolution of anime aesthetics has consistently emphasized expressive eyes as a defining feature since the medium’s early days. Pay close attention to the placement: eyes are typically positioned halfway down the head, with the inner corners often aligned with the nostrils. The space between the eyes is usually about the width of one eye. Mastering these proportions is the bedrock of believable anime eye drawing. Don’t rush this foundational step; consistent practice sketching basic eye shapes from different angles builds the muscle memory needed for more complex renditions later. Remember, every great anime eye starts with a solid understanding of its basic structure and placement within the face.
Step-by-Step Guide to Drawing Anime Eyes
Creating compelling anime eyes follows a logical sequence. Start with the basic shape: a simple oval or almond form, slightly tilted upwards at the outer corner for a classic anime look. Lightly sketch the horizontal center line (where the iris meets the upper and lower lids) and the vertical line indicating the eye’s direction. Next, define the upper and lower eyelids. The upper lid is usually thicker and more curved, creating a distinct crease, while the lower lid is often a subtle, thin line. Now, draw the iris – a large circle significantly overlapping the upper lid. Place a bright, well-defined highlight (often a small circle or starburst) within the iris; this is non-negotiable for that signature “alive” anime look. Add the pupil, typically a large, dark circle centered within the iris but slightly offset towards the highlight. Refine the iris by adding radial lines or subtle color gradients radiating from the pupil. Don’t forget the lower waterline, a thin, often pinkish line just below the lower eyelid. Finally, add eyelashes: short, delicate lines on the upper lid (curved upwards), and minimal or no visible lashes on the lower lid to maintain the large-eye effect. For beginners, using reference images is invaluable. Focus on one step at a time, building up the eye gradually. This structured approach demystifies the process and leads to more consistent results in your anime eye drawing journey. Practice this sequence repeatedly from front, side, and three-quarter views.
Essential Tools and Materials
Having the right tools significantly impacts your drawing experience and outcome. While traditional pencil and paper work beautifully, many artists prefer digital tools for their flexibility and undo capabilities.
- Traditional: HB or 2B pencils for sketching, 4B or 6B for darker shading, quality drawing paper (smooth or medium texture), kneaded eraser for highlights, blending stumps or tortillons for smooth gradients.
- Digital: A graphics tablet (like Wacom Intuos or Huion) paired with software such as Clip Studio Paint, Procreate, or Photoshop. These programs offer layers (crucial for non-destructive editing), customizable brushes for linework and shading, and easy color adjustment. Utilize the transform tool for precise symmetry checks.
- References: Always keep a folder of anime eye references (screenshots, art books, online galleries) categorized by emotion, angle, and style. Studying how professionals handle different lighting and expressions is irreplaceable.
Advanced Techniques for Expressive Eyes
Once you’re comfortable with the basics, elevate your anime eye drawing with advanced techniques. Mastering light and shadow is paramount. Anime eyes often feature dramatic lighting: strong highlights contrasting with deep shadows within the iris and beneath the eyelids. Experiment with different highlight shapes (stars, hearts, irregular blobs) to convey specific moods – a star highlight might suggest excitement or magic, while a simple circle feels more neutral. Color choice is incredibly expressive; vibrant, saturated hues are common, but subtle shifts (like adding a touch of blue to brown eyes) add realism. Consider the character’s emotion: tears welling up create a glossy, reflective surface; anger might be shown with sharp, downward-slanting eyes and dark shadows; sadness often involves downturned outer corners and larger, more prominent waterlines. Don’t neglect the eyebrows – their position and shape are intrinsically linked to the eye’s expression. Furrowed brows intensify anger or concentration, while raised inner brows convey surprise or worry. For dynamic impact, draw eyes from extreme angles, ensuring the iris and pupil correctly distort to maintain their circular appearance in perspective. Adding subtle details like tiny reflections of the environment within the highlight or fine veins in the sclera (the white part) can add astonishing depth. Explore different anime sub-styles; the hyper-detailed eyes of Sword Art Online differ vastly from the simpler, more symbolic eyes in One Piece. Understanding these nuances allows you to adapt your anime eye drawing to fit any character or story. For deeper insights into human anatomy that informs stylization, consult resources like Britannica.
Common Mistakes to Avoid in Anime Eye Drawing
Even experienced artists can fall into traps that make eyes look unnatural or amateurish. Being aware of these pitfalls helps you refine your work:
- Ignoring Symmetry (or Over-Enforcing It): While eyes should be generally symmetrical, forcing perfect mirror images looks robotic. Allow for slight natural variations in size, shape, or highlight placement, especially in dynamic poses. Use the vertical center line as a guide, not a rigid rule.
- Poor Highlight Placement: Highlights must align with a consistent light source. Placing them haphazardly (e.g., one eye having a highlight on the left, the other on the right) destroys realism. Decide where the light is coming from first.
- Overdoing Eyelashes: Excessive or overly long lashes, especially on the lower lid, shrink the eye and look cartoonish in a bad way. Keep upper lid lashes short, sparse, and focused on the outer corner; minimize or omit lower lid lashes.
- Neglecting the Waterline: Forgetting the subtle lower waterline or drawing it too thick makes the eye look cut off or unnatural. It should be a thin, soft line.
- Flat Irises: Drawing the iris as a simple flat color circle lacks dimension. Add radial lines, subtle color variations, and ensure the pupil is correctly placed relative to the highlight and light source. Shadows beneath the upper lid are crucial for depth.
- Incorrect Proportions: Eyes too close together, too far apart, too high, or too low on the head disrupt the entire face. Constantly check proportions against the rest of the head.
Avoiding these errors transforms your anime eye drawing from basic to professional. Consistent practice and critical self-review are key. Analyze your work against references: where does the light hit? How does the emotion change the shape? What makes the eye look alive?
Conclusion: Your Journey to Expressive Anime Eyes
Mastering anime eye drawing is a rewarding journey that significantly elevates your character art. By understanding the foundational anatomy, diligently following step-by-step processes, experimenting with advanced lighting and color techniques, and consciously avoiding common mistakes, you develop the ability to infuse your characters with genuine emotion and personality. Remember, the eyes are the focal point; they tell the story before a word is spoken. Practice is non-negotiable – sketch eyes daily from life, photos, and your favorite anime. Analyze how different artists convey specific feelings through subtle shifts in shape, highlight, and shadow. Don’t be discouraged by early attempts; every great artist started with wobbly lines. Embrace the learning process, be patient with yourself, and celebrate small improvements. Your unique style will emerge as you internalize these principles. Ready to bring your anime characters to life? Grab your tools, find some inspiring references, and start drawing those captivating eyes today. For more structured tutorials and community support, explore our resources dedicated to anime art mastery. Your next masterpiece is just a sketch away – visit here to discover advanced techniques and join our vibrant artist community. Keep practicing, keep experimenting, and watch your anime eye drawing skills transform your art!